Wednesday, July 20, 2011

NOTD: Betsey Johnson Inspired/Leopard Accent

Hello lovelies,

Here is a fun nail of the day with one accent finger in a combo of my two latest obsessions: a half moon manicure and a leopard print. I know, I know, you're shocked. Well get over the palpitations and take a gander at THIS:


Whoops, nope, that's a picture of my puppy Izzy.

Here's the nails:
Hope you enjoyed!

Wednesday, July 13, 2011

Metallic Leopard Print Nail Art

I had a small tragedy today with a bottle of China Glaze polish breaking in the large Urban Outfitters bag I keep most of my polish in, and gooping up all my cheez wiz. Lesson learned? I need to store my polish in a more secure way to avoid goopiness and breakage.

Took my puppy to the vet today also, and got some ickiness to deal with in the next few weeks, and while I am so thankful that it isn't anything serious, the stress of the day meant I needed to focus on a project. I've done a super cute free-handed leopard print nail before that was the traditional leopard colors, but this time I wanted something subtle and "fierce."

So I decided to try out a subtle, metallic leopard print nail using China Glaze polishes in order to "pour some out" for my lost CG homie. I used three coats of China Glaze "Avalanche" (a periwinkle/silver frosty metallic ) for the background color, and using a small nail art brush, I made some blobs of silver spots using China Glaze "Jitterbug" (a charcoal silver micro glitter.) After letting them dry a bit, with a coat of Seche Vite in between, I used Orly "Goth" (a semi-opaque black with silver micro glitter.)

The secret for this design, which is crazy easy by the way, is to make blobs of color that aren't uniform, then let them dry. Then when you follow up with the outlines of the spots, just make little parentheses around the colored blobs with a darker color. And shazaam! You've made a leopard print finger nail. Well done, you!

OK, on with the pictures:


Hope you enjoyed!

Thursday, July 7, 2011

My foray into nail art. Be gentle.

Today's NOTD is a super cute takeoff of something I've had in my head for a while. Do you ever have that happen when you picture exactly how you want your nails to look, what colors/designs you want to have and then it comes time to actually do it and you don't have the EXACT color you pictured and your inability to draw a straight line mocks you mercilessly while you tremble, nail art brush in hand.

So, after all of that drama, I decided I needed to stop with the half-moon manis (I know you were sick of them too,) and try something a little funkier than that. I picked up Sally Hansen Insta-Dri in Lively Lilac and freehanded a tip and line in China Glaze Midnight Mission. Here it is for your enjoyment:


Looking forward to trying more along these lines. Hope you enjoyed!

Wednesday, June 29, 2011

An explanation of sorts

So in the past week, I've been working like a dog at changing career paths/venues. I'm being considered for a pretty major blogging gig with a very reputable establishment. I'm told that can lead to a ton of exposure and the chance to "create a following" for myself and my beauty pursuits, along with random ramblings about my life, neighborhood, and what it's like to be me.

I've been kicking around a few clever names for what this endeavor will be called and I have to say that this is the scariest thing I've done in a long time. In my current field, I have a ton of experience which translates to a general feeling of badass-ness and confidence that can be backed up with skill and a track record of success. In the field of blogging, creating a social media following for myself, and using said media to hype my blogging efforts is definitely something I could do, but the thought of it is scary has all heck.

I'm really looking forward to the challenge, (provided I secure the job, of course) and the opportunity to wax poetic on such topics as parking meter fare hikes, local events, the coffee shop down the street's snarky manager, and bien sur, my current nail look.

Here's today's hopefully good luck mani featuring Sally Hansen Complete Salon Manicure in Coral Fever and Barracuda from the 2011 Tracy Reese Spring Collection.

Holler if you love the lighting at Starbucks!
Alright kids. Tell me in the comments if you have a good luck manicure, or what you would wear to an interview where you would want to be perceived as trendy... Let it rip.

Hope you enjoyed!

Tuesday, June 21, 2011

The Makeup Show Chicago: Review and Haul

On June 12-13, the Makeup Show, usually a NY/LA institution, brought its amazing line up to Chicago to a drooling audience of every level of MUA and enthusiast.

My experience at the Makeup Show was a very quick three hours on the end of the second day. My real job got in the way a bit, so I was there Monday afternoon from 2:30-5:30pm. This ended up being the perfect amount of time to run through, look at what the vendors had to offer, and check out what this show was all about.

Now I have to mention that I did not visit any of the seminars or Pro Pod programs, I just walked the show floor and took in what the general vibe of the show was and what each vendor brought to show off. Most of the vendors were artistry lines hawking their wares, along with a plethora of vendors with airbrush systems, and of course the Pro versions of popular lines like Makeup Forever and MAC.

Most of the vendor booths were just big "here's what we have, so buy it" situations. The rest were visually stimulating, but just a way to pass a catalog and discuss what they can offer each artist. There were actually some great vendors there that would appeal to niche artists that do body painting, airbrush/HD makeup, bridal makeup, and the like.

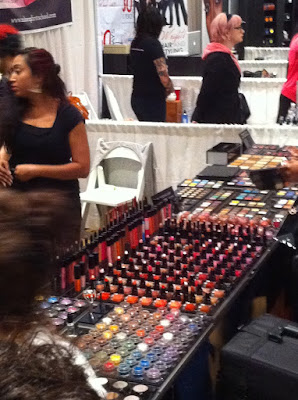
General insanity around the Inglot booth. So much color!
Some of the highlights were the Kett cosmetics airbrush system and the Nurturing Force booths. When I arrived at the show, I met up with a few artist friends who were standing at the Nurturing Force booth, listening intently to a woman talk about this product called Blot Out Offensive, which is an oil and shine controlling primer cream. The booth was manned by a very nice husband and wife team who were friendly and happy to answer questions. They were actually really cute with their plain set up and package deals on their products. Based on the fact that this was the first booth I'd visited, I decided to pass on picking some up. I have a million primers, so I assumed that this one was no different. My one friend bought a primer and the other passed on it too.

Later in the afternoon, we visited the Kett cosmetics booth and reveled in their amazing airbrush system. We received a personal demo in addition to the booth demo of tattoo cover that was happening behind us. This company gets it. The product they use is silicone powder based, with lots of yummy antioxidants and moisturizers to make it heaven on the skin. I can't say enough about the foundation product that Kett cosmetics is bringing to the market. Check it out if you get the chance. This company not only uses fabulous ingredients, but they teach you how to use their products as well. They do airbrush 101 and advanced classes in a setting of no more than 10 students at a time. Now these classes aren't cheap, but by attending one, you get a $100 product credit to re-up on stuff for your kit. Cool? COOL!

While we were hanging in the Kett booth, I noticed that the incredibly friendly Kett rep, Brian, was using Blot Out Offensive as his primer before doing demos on the backs of hands. When questioned about it, he said that Kett LOVE LOVE LOVES this primer because they know what goes into it, and that being a natural product, it is important to everyone's client to know what is going on their face. He gushed about the creator of this amazing product that disappears on HD cameras, and blocks shine all day long. Turns out, it was the nice lady from the Nurturing Force booth who was all unassuming and lovely. She used to source ingredients for the big cosmetic corporations, and realized that there was a better option out there: natural ingredients that actually work, and can be good for your skin! While I had already spent my Makeup Show budget, you can pick up this miracle product at nurturingforce.com. I intend to do so as well.

In my next post, I'll show you the haul I took away from this awesome event. Hope you enjoyed!

Monday, June 20, 2011

I am terrible at things.

For the eight of you that have visited this site since its inception, I apologize for my distinct lack of posting. During the day (or night,) my "real" job has been busy as it could possibly be. With corporate visits and Father's Day last week, my free time has been cut to a non-existent level. I've only had time to change from the turquoise glitter polish that I had on (Finger Paints "Laugh My Art Off") so as to not offend the president of my company. Can we talk for a minute about how difficult that was to remove? I was about to call in the mounted police and ask them to bring a belt sander. The only thing I could do was layer two coats of Sally Hansen Complete Salon Manicure in "Commander in Chic" over the top to try to camouflage my LOUD LOUD LOUD nails. I thought "Commander in Chic" was appropriate for the president's visit, right? Get it? Moving on.

Since I've been working twelve to thirteen hour days all week long, my feet were de-stroyed. So today, as my first day off in over a week, I decided to get a mani-pedi and let someone else do the work for a change. There is a fantastic little nail salon near my apartment that does a spa mani-pedi for $40 and they have a great selection of colors, mostly OPI, then some Essie, followed by a smattering of China Glaze and today I even spied some Color Club. My pedicure was heavenly with the typical massage chair/scented fizzy salts/foot and leg massage as you would find anywhere else. I have completely forgotten the color I selected for my toes, but it is a pretty purple/fuschia hybrid from OPI.

The manicure took over an hour and it was ok. My nail tech was very thorough and took a ton of time with the application. I, of course, messed up the thumb nail before I even left the place, but they were super gracious and helped me to fix it within two minutes. Hooray for Nail.com salon!

Here's my fancy mani: OPI Yodel Me on My Cell from the Switzerland Collection. I know I'm a little late to this party, but the turquoise shimmer caught my eye from the start.


Hopefully now that the insanity is over, I'll be able to get back to more regular updating. Hope you enjoyed!

Sunday, June 5, 2011

InStyle Magazine Leopard Print Nail Trend

Recently InStyle magazine's Twitter feed featured an easy leopard-print manicure for the time pressed or the non-nail art inclined. They suggest "1. Lacquer nails with two coats of gold or metallic brown (we like Dior Vernis in City of Gold, $21; dior.com). Allow at least five minutes for the polish to dry completely.

2. Sweep one heavy coat of black shatter polish like OPI nail lacquer in Black Shatter ($9; at Ulta) over the entire nail."


This look actually ends up looking very much like a leopard or tiger print on the nail. I used Sephora by OPI in Rumba Romance under OPI Black Shatter back in April for a ver similar effect. My co-worker's reaction? "Dayum. Kitty's got claws."


It looks really classic, despite being a shatter look, and I got loads of comments and compliments on the leopard/cat print that it turned out to be. It wasn't the intended look, but it's definitely something I'd wear again.


Here's my version:


Thursday, June 2, 2011

NOTD: China Glaze Flip Flop Fantasy

Nail of the day today is China Glaze Flip Flop Fantasy with China Glaze Liquid Leather tips. I wore this combo a few weeks ago, and as the bright bright bright color started to grow on me, I wondered how a tip color would look under Black Shatter. 


Guess we found out! To borrow a line from Tim Gunn, it's a lot of look, but still pretty eye-catching and summery.


Organix Renewing Moroccan Argan Oil Penetrating Serum

The Moroccan argan oil craze is in full swing, and as a long-haired gal, I was excited to try the trend in a relatively inexpensive way to help with my dry, color-treated ends. The bottle directions suggest putting it into the ends of towel-dried hair before heat styling, and/or using it to smooth and and shine over dry hair.

I've used it both ways, and I have to say that it does what it says it should. When I used about a quarter-sized squeeze on towel-dried/brushed hair, it helped with manageability, shine, and keeping my naturally wavy hair from getting too bushy doing a rough (non-round brush) dry.

Now, a word of caution. This is NOT a pure Moroccan argan oil like the organic pure argan oil by Josie Maran, etc. This product contains dimethicone, cyclomethicone, linseed extract, among other ingredients. This argan oil blend keeps hair from becoming greasy, provided you use the recommended amount. I wouldn't use this product too close to the root, as it could definitely make you look like one of the McPoyles from It's Always Sunny in Philadelphia. Works well whether I style straight or curly after drying. I also noticed added shine after using a straightening iron.

This is a nice, inexpensive alternative to a pure argan oil or another Moroccan oil salon product. If you're looking for shiny, manageable results, this will work. It helped make my split ends a little less noticeable, and as an added bonus, you can rub any excess oil into your cuticles or elbows. Win! The fragrance is mild but pleasant and clean-smelling. I think I paid $7 for this a few months ago, and I still have over two-thirds of the 3.3oz bottle left. Pretty great value for a product I use almost every day.

Sephora Spring Nail Trend DIY

In March, I was playing around with the Sephora iPhone app and stumbled upon some Spring trend videos. They were talking about brights, romantic looks, and how you can translate some of the Spring runway trends into your everyday makeup look. During one of the videos, an image of the model for the romantic look flashed across the screen with a really cute subtle color block mani on her artfully displayed fingers. I was able to scrub the video and get a screen grab:


This nail look became my obsession. I couldn't think about anything else until I found the colors I needed to make this happen. Everything about it was appealing. The subtlety of the shades, the awesomeness that is the half-moon mani, and the fact that the model looks a little bit like Fiona from Burn Notice, right? So my search was on.


I dragged my BF to Ulta with me, armed with my precious screen grab to see if I could match the colors enough to make it work. We must have looked like total psychos, huddled in the corner of the Ulta, holding up different polish shades and saying, "No, too brown," or, "This one looks right for the base shade, but do I already have this color?" Then congratulating each other with high fives when we settled on the appropriate colors. This is why I love him. He doesn't mind humoring my quests for silly things like this.

Ended up with Ulta Professional Nail Lacquer in "Girl Next Door" for the lighter color and an OPI color I already had, everyone's favorite "Barefoot in Barelona."

So here's how it came out. Please excuse my horrid, ugly cuticles in this picture. It was taken after a rough work week which was murder on my hands. Seche Vite basically made it bulletproof, so no chips! This was taken in natural light on the steering wheel of my car, because I'm classy like that.


Hope you enjoyed! I promise I'm going to move on from the half-moon/color block manicures soon. I seem to be going through a phase with them. Next, I'll probably experiment with the new set of nail art brushes I picked up at Sally. Yay.

Monday, May 30, 2011

NOTD: May 30, 2011

Picked up Orly "Green With Envy" on a whim from Ulta last week. I"m pretty sure I've looked at it a hundred times. Not sure what made me pull the trigger this trip, but I've paired it here with a Revlon Nail Enamel in "Minted."

As you can tell, I'm a fan of the half moon manicure lately. For whatever reason, I can't just do a plain one color mani right now.

Here's the application details in order over bare natural nails:

Sally Hansen Hard as Wraps
Two coats of Minted, which is a thin, semi-opaque creme with no shimmer
One medium coat of Poshe, which I let dry for five minutes
Applied nail tip guides onto space where I wanted Minted to show through, making sure the corners were well adhered
Three coats of Green With Envy, which was a VERY thin, translucent creme with no shimmer
One medium coat of Poshe over semi-dry nails


The first picture in natural light makes it look very blue. The picture on the right with the flash is much more true to life.

This is one of the only Orly polishes I've tried, and I have to admit that I was a little taken aback by how thin the consistency was. It would definitely suit the nail artist who likes to do several thin coats to build up opacity, but I don't have the patience for that. I do, however, love the color. I'm really drawn to blue greens lately and have been eyeing a similar color from OPI for a while now too. Stay tuned!

Hope you enjoyed!

Tuesday, May 24, 2011

Livestrong Inspired Manicure

My little brother (@LaserRobotTime on Twitter) is running his first marathon this weekend in honor of all of my family members that have battled cancer. Throughout my Grandfather's illness, my family relied on a lot of the information provided by the Livestrong Foundation. Long after the wristband trend died down, this non-profit has helped countless families and patients learn about what to expect, and what support is out there for them. In order to help raise awareness for my brother's fundraising efforts, I decided to try out China Glaze's Solar Power in a half-moon manicure over China Glaze White on White.

Please pardon the junkiness around the cuticles. I've yet to invest in one of those remover clean-up pens. I used regular french tip guides for the clean half-moon line. I wanted to make the half-moon a lot larger than normal, to almost appear color blocked.

Here's my process:

Sally Hansen Hard As Nails acrylic strengthener as a base coat over my natural nails. Then two coats of China Glaze White on White, concentrating on the base of the nail for opacity. One coat of Poshe, and then I let it sit for a few minutes so the stickiness of the french tip guide wouldn't mess up the base color. Then applying the manicure guide with just a little white peeking underneath, I applied two medium coats of China Glaze Solar Power. One relatively thick coat of Seche Vite sealed it all in.

I think I'll probably use Orly Instant Artist in black to draw a thin black line over the half moon line to make it even more Livestrong inspired and put "Go Tyler!" on one of the nails.

Thanks for checking out my blog. I'll be writing about everything from nail polish to hair products. I'll add reviews of what I'm loving now, and what I'm using now. While I love MUA's reviews, I'll go slightly further in depth.